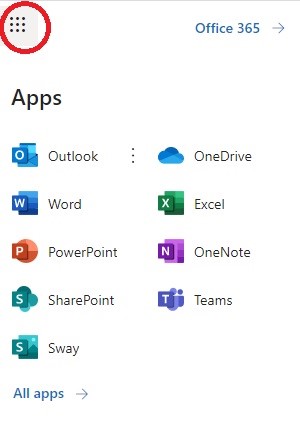
After you login to any of the MS 365 apps, you should be able to easy navigate between all of them. In the top left corner, you will see the grid button:
|
This button will expand, once clicked, allowing you to access any apps available to you:
|
|
|
|

|
The purpose of this resource is to orient new Faculty of Health Disciplines (FHD) Microsoft 365 (MS 365) and Microsoft Teams (MS Teams) users to this valuable communication tool. Learners and instructors will benefit from this orientation as they prepare to make videos for communication and assignment purposes within our FHD courses. All Athabasca University (AU) learners are provided with MS 365 upon registration to their first course. This account must be activated. If you have not activated your MS 365 account, please follow the instructions provided. Access to MS 365 comes with number of useful apps/tools. We encourage you to review the information provided by the university on the AU Microsoft 365 website. Microsoft is responsible for all support of the MS 365 service and products; and provides comprehensive video training for all apps/tools through the Microsoft 365 Training site. If you are not familiar with MS 365 apps/tools, we ask you to review training material, especially material that specifically addresses Outlook, Teams and OneDrive. Because you may be using MS 365 for recording and managing some of your video communication and assignments, here are ways to optimize the use of its tools in the set of instructions below.
|
After you login to any of the MS 365 apps, you should be able to easy navigate between all of them. In the top left corner, you will see the grid button:
|
This button will expand, once clicked, allowing you to access any apps available to you:
|
Both learners and instructors will schedule meetings in Teams and invite others to attend. You may also want to change participant roles within a meeting to determine, for example, who can start and stop a recording.
As part of your FHD course work you may be asked to create videos. TEAMS will give you an ability to record videos and share them with instructor or other learners. It is especially useful when you work in pairs or groups.
Tips:
|
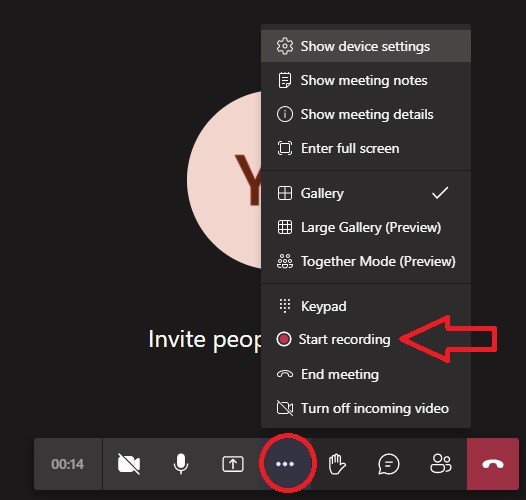
To record the video, start a meeting, and use record button on a screen as shown below. The stop recording button will be located in the same spot once you start recording.
|
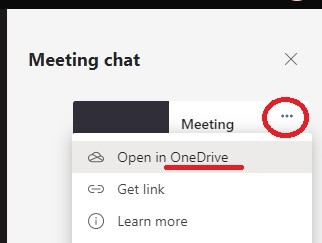
Once you stop recording, your video will be processed and stored in OneDrive or/and SharePoint (if you work as part of a bigger than 2 people group). The link to the video will be posted in a Meeting chat; it will also show you a location where it is stored and give you ability to retrieve the direct link and access the recording.
|
Click on the ‘Open in OneDrive’ link, it will bring you to the video recording for viewing. You will be able to download it or view it in that screen. To access the app where the video is stored, click ‘X’ in the menu as shown below.
|
You will be able to manage your video from there.
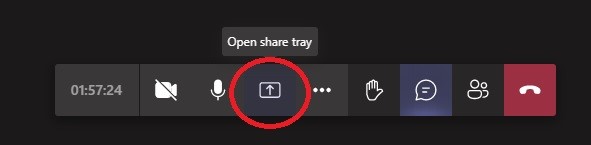
As part of your program sometimes you may need to present your videos to the class. You can share a video easily from OneDrive or desktop/ You should be able to do that by sharing your screen.
|
Tips:
|
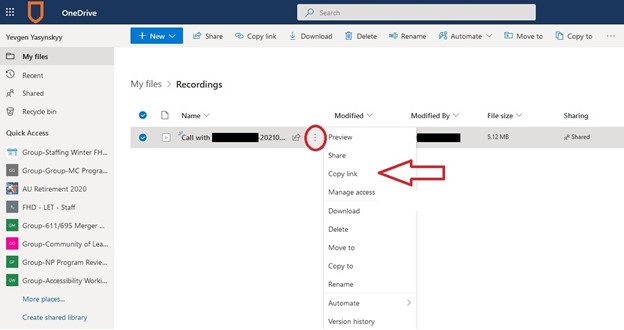
You cannot upload videos to assignment drop-boxes in Moodle. Instead, you will share the link to the video on your OneDrive with your instructor.
One of the ways to get the link to the video, is to access your OneDrive, and copy the link for ‘Copy/Paste’ option to include it with assignment submission.
|
Tips:
|

|
Licensed under a Creative Commons Attribution-NonCommercial 4.0 International License, except where otherwise noted.
TopLast updated:
Copyright © Athabasca University