NURS438
Centre for Nursing and Health Studies
Formatting Your Papers
in
APA Using Microsoft Word 
This tutorial is designed to help you format a new Microsoft Word document to reflect the expected APA style in all of your written assignments. In this instance, "Style" refers to a formatting feature in Word which captures font style, font size, margins, as well as using document headers and page numbers, and page inserts. At the bottom of the page are instructions for saving a word document in Rich Text Format.
While this tutorial may seem to be a lot of work to format according to APA style, you will save yourself immense time in all of your subsequent papers. If you have any problems using this tutorial, you should refer to the "Help" function of Microsoft Word.
Open a New Word Document
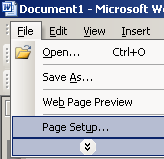
From your "Start Menu",  open a new
Microsoft Word document. Next, select "File"
from your menu bar and select "Page Setup".
open a new
Microsoft Word document. Next, select "File"
from your menu bar and select "Page Setup".

The Page Setup window will allow you to change the general setup of your word document. First, select the Layout tab, and check that the Header position from edge reads: 0.5"

Change Your Margins
Select the Margins tab, and then change your margins to show one inch for the top, bottom, left, and right sides. Leave the gutter positions intact. Select the default button, then click on the OK button. This will take you back to your blank document. Note: Selecting the default button will ensure that your new style will automatically have one inch margins.
Change the Style
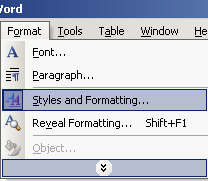
Select "Format" from the menu bar, and then select "Styles and Formatting".
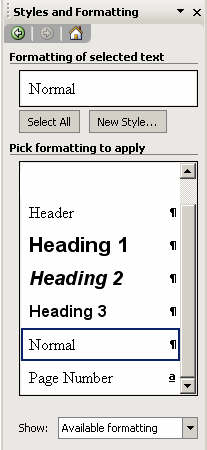
Note that the window shown to the left represents Microsoft Word 2003. If you have an earlier version of Word, your next window may look a little different.
Next, you are asked to select the formatting to apply to your new style. In this picture, you will see that "normal" has been selected. Remember that you have already formatted your margins based on "normal" so we want to keep that formatting without having to go back and re-format. Select New Style.

Now, you will create your new style based on your previous formatting. The next window that appears has three main steps: Properties, Formatting, and Saving. There are several choices to make in each section. The pictures below guide you through the choices to make in each step.
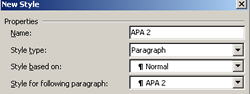
Step One: Properties
- The first choice to make in properties is to give your new style a name. In this example, it has been labeled "APA 2"
- Next, ensure that Paragraph is selected as "Style type"
- Next ensure that Normal is selected as "Style based on"
- The last choice to make is to ensure that APA 2 [or whatever name you labeled for your new style] is selected as "Style for following paragraph"
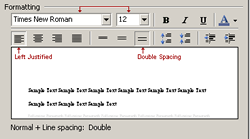
Step Two: Formatting
- The first choice to make in formatting is to select your font style as Times New Roman
- Next, ensure you have selected 12 as the font size
- Next, ensure your paragraph is justified to the left
- The last choice to make is to ensure that the spacing is set to double spacing

Step Three: Saving
- The first choice to make is to ensure you have checked "add to template". This will allow you to select this new style each time you want to create a written assignment based on APA style.
- Next, click OK
Create a Title Page
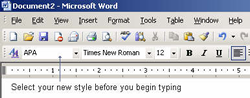
After clicking "OK" in the above window, you should be back to your main word document. Select the new style you have created from the style drop down box.
You are now ready to create your assignments based on APA style formatting.
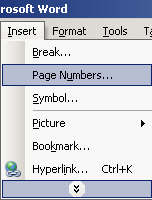
Your next step is to create a title page. Start by typing your running head on the first line of the paper, flush to the left. Next, insert your page numbers.
Select "Insert" from the menu bar, and then select page numbers.
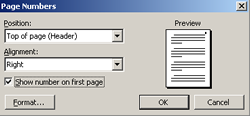
In this next step you will be asked to format your page numbers. Select "Top of page (Header)" for your position of the page numbers, then select "Right" for the Alignment.
Remember to check off "Show number on first page", as shown below. Then click "OK".
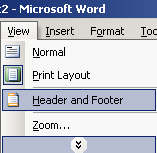
Next, insert your document header. Select "View" from your menu bar, and then select "Header and Footer".
Before you begin typing, click "Right Align" in the formatting menu bar. In the header dialogue box, type your document name.

To exit the header dialogue box, double click anywhere on the white space of your paper, or click "Close" on the header and footer tool bar.
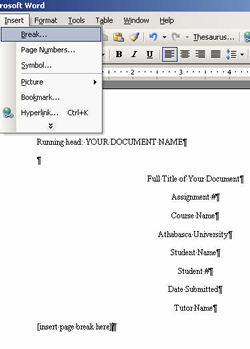
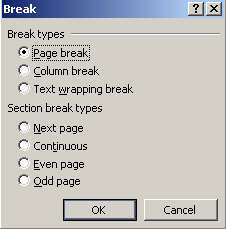
Finish typing your title page, and insert one double space after your Tutor Name. Next, insert a page break. Select "Insert" from the menu bar, and choose "Break".
Create Your Paper
On the next page, insert one double space. Type your document name [full title of your paper] centered on the first line. On the next line, insert a tab [hit the tab key on your keyboard] and begin typing your paper.

Finish typing your paper, and insert a page break at the end. The next page will be your reference page.
Remember to save your work at regular intervals in case of a power outage or system failure.
Hanging Indents and Your Reference Page
Refer to the APA manual 6th edition or the many resources available in the Evaluation page or the writing resources for formatting of references and in-text citations.
APA references are written using hanging indents where the first line extends out to the left hand margin, but the rest of the entry is indented. These are easy to create in a word program. Don't get into the habit of using a carriage return [shift], the tab key, or spaces to create hanging indents because when your work is transferred to a different computer, the result may look quite differentand WRONG.
Place your cursor on the first line of the paragraph where you want to insert a hanging indent.
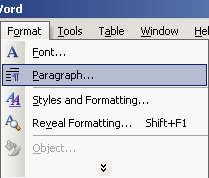
Select "Format" from your menu tool bar, then select "Paragraph" as illustrated below.
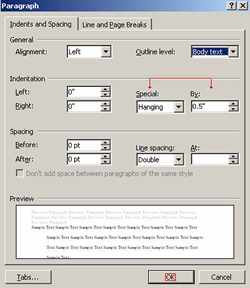
The next window allows you to choose the hanging indent. Select "Special" as your indentation option, then select "hanging". Check that your indentation spacing reads: By 0.5".
As you can see from
the above window, you are able
to preview your
paragraph before clicking "OK".
You might wish to
experiment with the "first line" option available in
the "special" drop down box for formatting the body of your paper.

Saving Your Work as Rich Text Format [RTF]
All of your assignments must be submitted in Microsoft Word or Rich Text Format. To save your work in Rich Text Format, select "File" from your menu tool bar, then select "Save As".
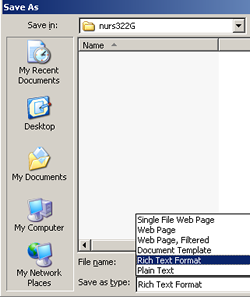
From the "Save as Type" drop down box illustrated below, select "Rich Text Format". Ensure you give your document a name you can remember, and save it in the folder where you keep your assignments. In the example below, the folder name is Nurs322G.
Remember to click "Save" after giving your document a file name and selecting "Rich Text Format" in the "Save as Type" drop down box.